With the other materials included, we hope to finish the upstairs bathroom under $2,300. Not too shabby.
I constantly check retailmenot.com for discounts, Amazon for “used like new” items, ebay, craigslist, overstock.com and a plain, old Google search in shopping…those are my tricks to finding deals. Build.com has been a great resource and I can generally get 5-10% off there. We also travel to architectural salvage and builder outlet stores in the Minneapolis metro. What are your tricks to getting amazing deals?
Keep in mind that we widened the doorway from 24 to 30 inches, added stackable washer dryer capabilities with storage (taking out the second bedroom closet to do so) and we still need to finish the basement bathroom then demo the upstairs bathroom and refinish that tub which is a 3 day process.
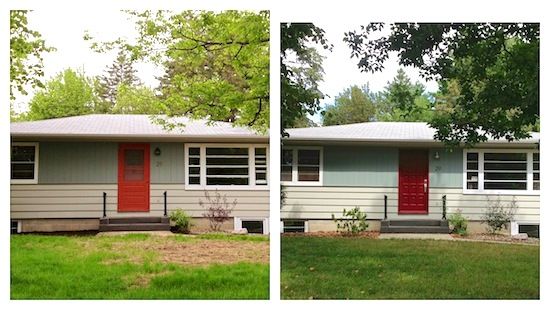
To see our paint choices for the house see this post.
I finally got around to charting the paint colors in our house along with a few other sets (like lighting and the picks for both bathrooms) I will be sharing over the next week. We’re still not sure about the kitchen and bathroom paint colors. Any suggestions?
Greg’s 29th birthday and my 31st have gone by, his parents came to visit (it was great-thank you so much to them for the help), we got a loan to finish the rest of the house, we were asked to be featured artists in Minneapolis, a handful of pieces were finished and a few were even sold in the time we’ve been gone around here.
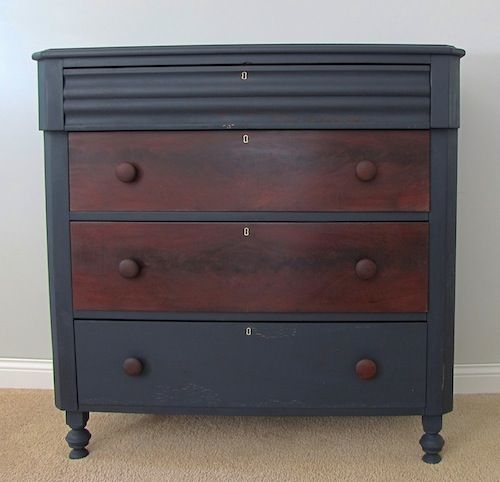
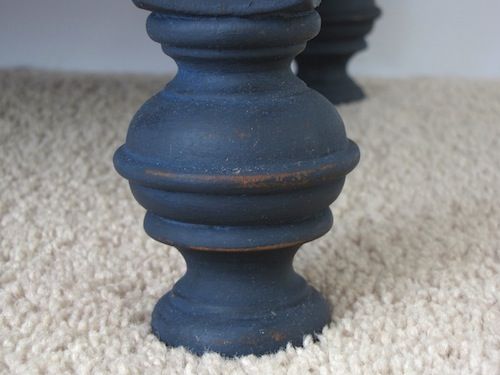
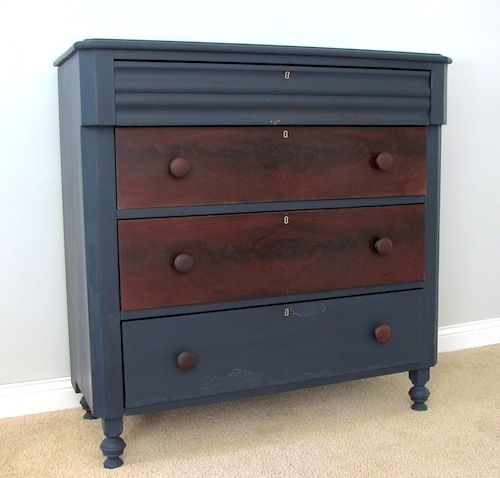
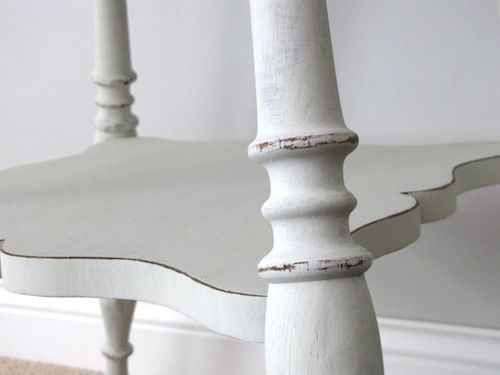
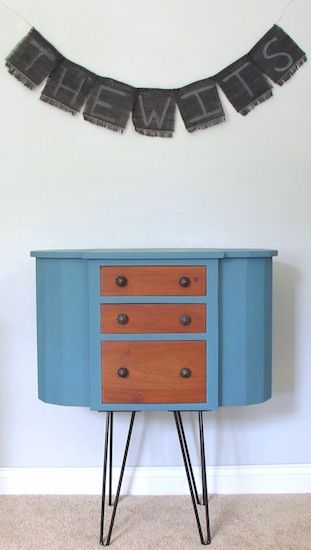
Lieutenant Dan (the free dresser without legs on the curb last year) was finished a few weeks ago and I love him so much with his dark blue Miss Mustard Seed milk paint, chipping and two beautiful walnut crotch veneer drawer fronts. Oh, and his “new” antique legs are a perfect match.
We picked up another dresser at a garage sale that required very little work to fix. The rustic, natural wood peeping through with the green spoke to me so I left it. Not to brag (okay so I am) but the last four pieces we’ve picked up cost us a total of $8. 3 were free.
This curb dresser was repaired, refinished and sold within a week. It went to a great couple in St. Paul for their nursery.
The sideboard sold to a lovely lady in Red Wing.
I had a garage sale over the weekend. Just willy nilly hey, I’m going for it with about 4 hours of prep the day before. I should have kept it one day but was in the groove and tried again the next day which proved a mistake. I closed after 90 minutes with only 4 visitors and $.50 then went around town to the numerous garage sales. No luck finding anything but better than sitting and staring into space.
Summer is back after a brief glimpse of fall-like weather. Minnesota is reaching record temps today. Later this week will bring more fall-like temps again. I’m ready this time. I love fall.
Things started to look like we wouldn’t be able to come up with the funds to get the house completed in our timeline which started the crazy cycle of negativity, paranoia and melancholy. Things were slow going, too slow, to achieve the goal to be done in spring. Pretty much everything that could go wrong did. That was when we sat down and decided to get a loan. We just paid off our car, the rate is good and we plan to pay it off when we sell the house. We wish to let it go and move forward. We’re in better days.
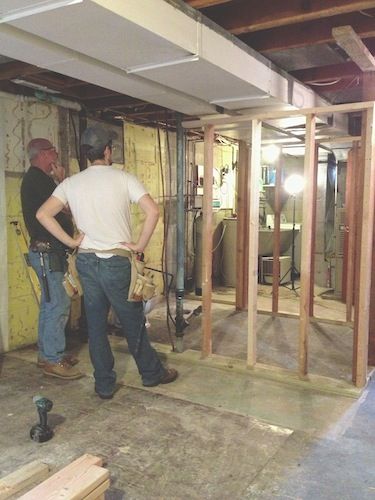
So, Greg was on vacation last week and we worked on the house.
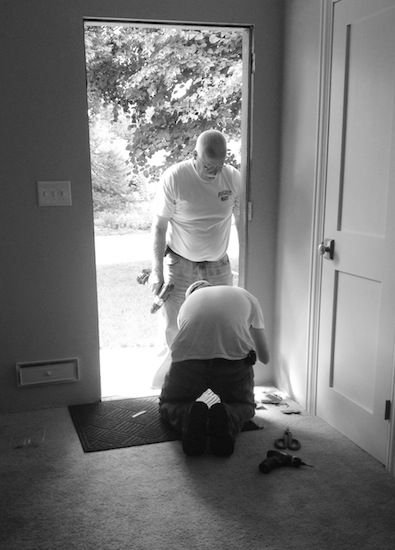
Greg and his dad
With the help of his parents and then just us. The basement bathroom was tackled. Still being tackled. For months it sat untouched. Not since my parent’s visit because we simply did not have the money.
We can now do laundry upstairs instead of down in the dark utility room…although we can’t afford a stackable washer and dryer. It’s a nice feature though.
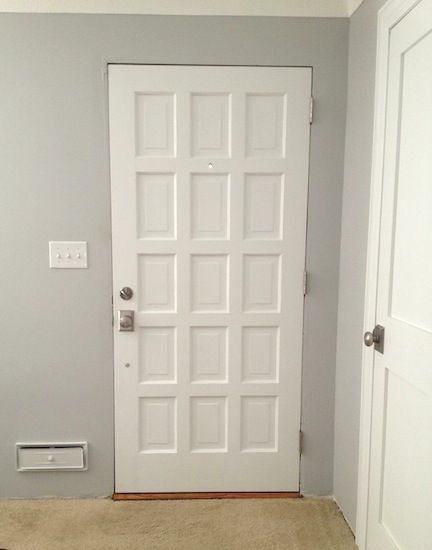
With the handleset and other supplies the project cost less than $125. I’m pretty proud. Plus we’ve had many neighbors tell us how great the place looks these days. Minus the neighbor boy (who has most likely never even been by our house since he doesn’t live on the lane but on the main drag) who told his friend that when he looks at our house it makes him glad to have his. That was not a good day.
We picked up these cool chairs from the same woman we got the patio chairs from in town. $40 and home they came. I’m in collecting for ourselves mode, looking for things to bring with us from Minnesota to Washington.
When we bought the house…
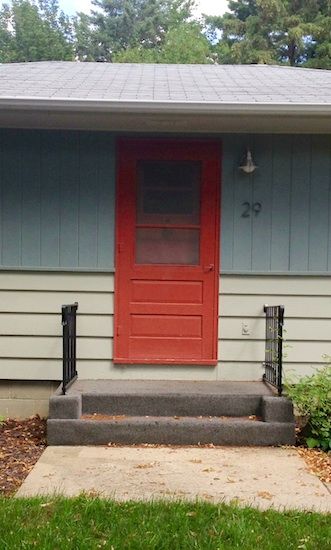
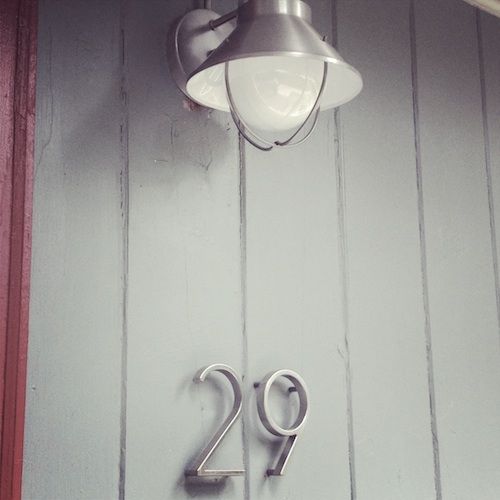
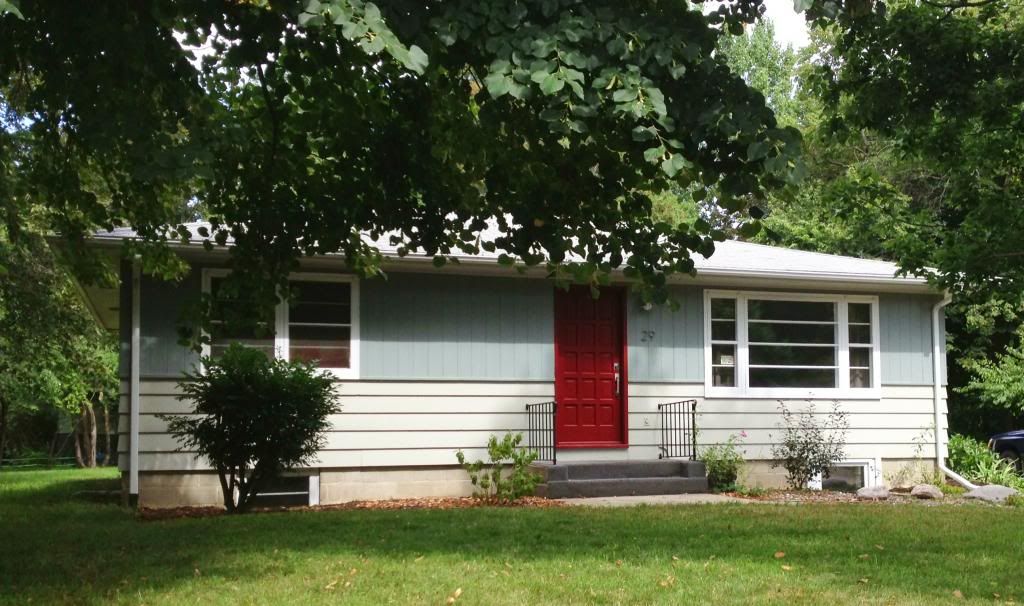
I’m aware that I blurred the house numbers in one photo and left it for the others…don’t stalk me please. And don’t pay any attention to the wilting azalea…it’s very hot and I did not prep the plants before this shot.
A trip to Lowes and Home Depot yesterday provided us with the new tile for the bathroom and supplies for a future project using the butcher block maple top we picked up for $2 a few months ago. I ordered a new pedestal sink for downstairs, new light for the dining room and bought new running shoes so I can get my butt back on track. A good deal of that stress would have been remedied if only I kept to my treadmill routine.
So, I stepped back for a month (intend to continue that from time to time) and came back to you fresher, clearer minded, focused and determined to get the house finished and on the market so we can begin a different life near Seattle.
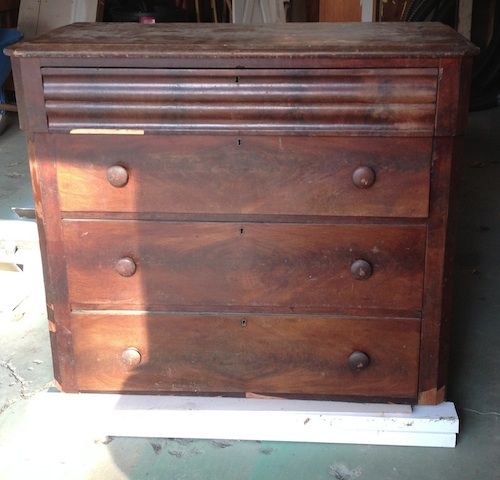
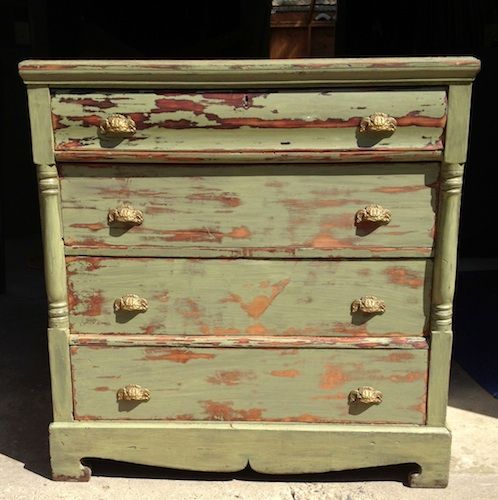
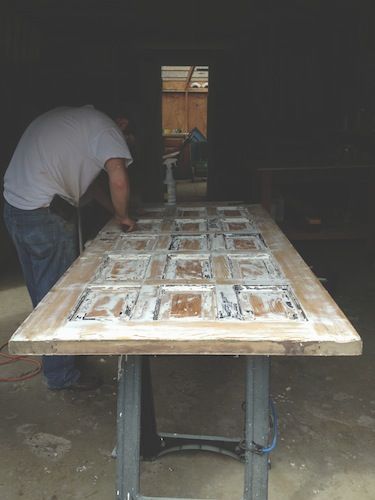
Instead of telling you how horribly wrong the spray painting went on our “new” front door with our new Wagner sprayer last weekend (popcorn ceiling texture, anyone?) or how I bamboozled myself into thinking doing a laminate dresser would be “not that bad” (the green one) or how it took a lot longer than expected on the black campaign dresser or how the plan to remove the paint from the brick to help waterproof the basement didn’t remotely work…I’m going to show you this beautiful, wonderful, free curb dresser we picked up last weekend.
It’s not really beautiful or wonderful but it came just when I was about to give up on finding a project and in general.
That bad last week was relentless and I had thoughts of just quitting refinishing furniture (and at times doing what we want to the house). Not permanently (I say that now but I think my mind was somewhat set on permanent then).
After a number of just bad feelings, doubt about myself and everything I do, things we planned for months (and spent a good amount of money on) not working and very little money left for us to work with, it all equated to giving up. Then we drove a block over and saw the free dresser (bathed in light in my mind) which makes it the most beautiful and wonderful thing I’ve seen in a while (besides Greg aww). Instantly I was refreshed and inspired. There may have even been a tear or two. Felt like a sign.
We were also picked as featured sellers on Krrb and Apartment Therapy which helped. Two signs.
I immediately started working on it. With the shape the veneer was in this could be called a solid wood putty dresser. I kid. Each layer of putty takes a bit to dry so it’s slow going but each step has me filled with joy.
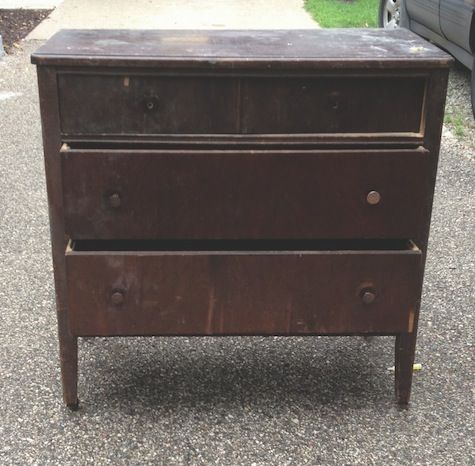
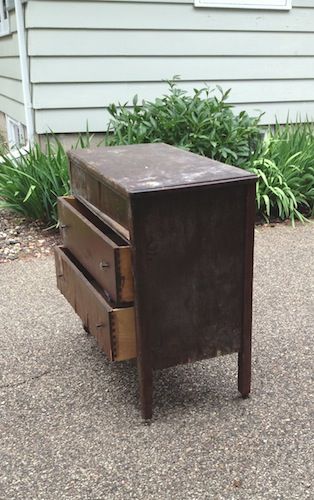
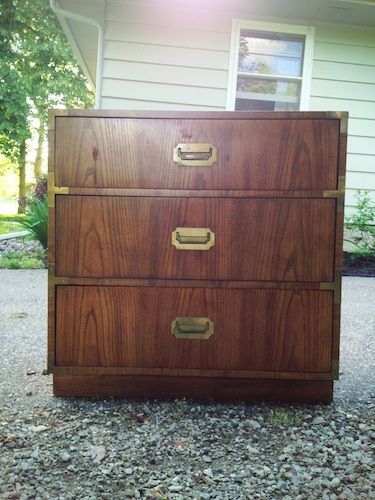
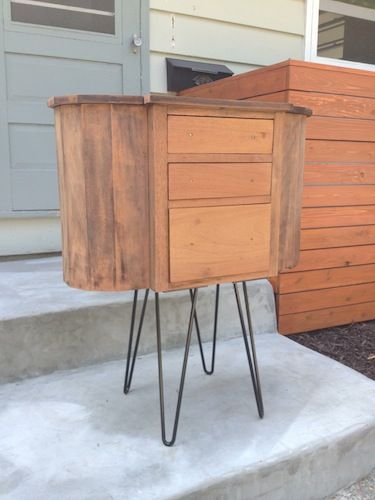
Before
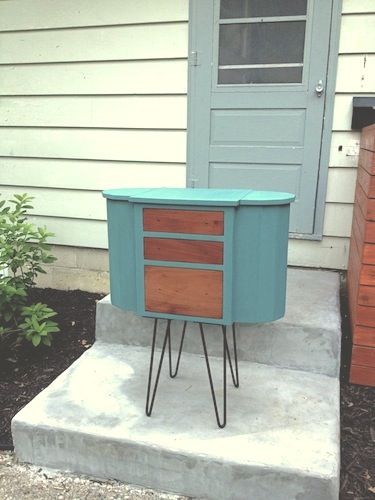
After
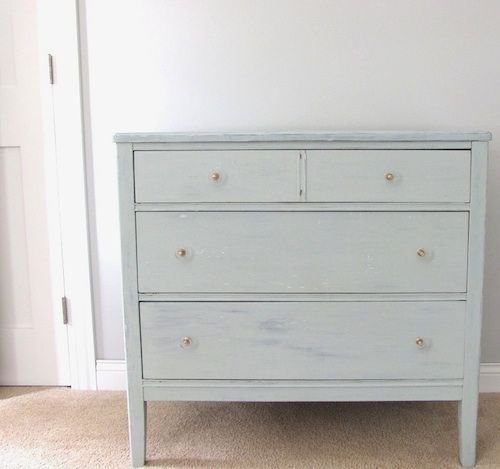
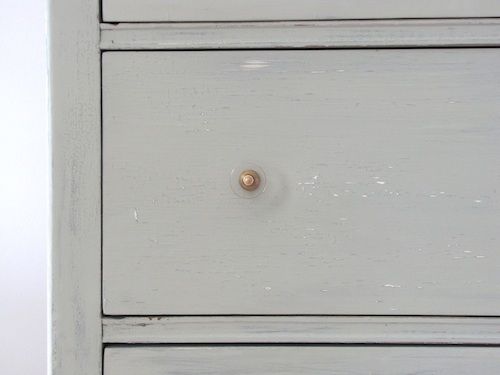
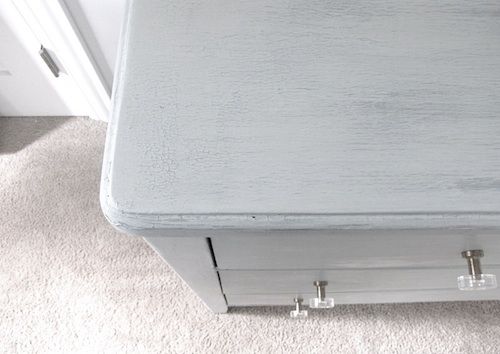
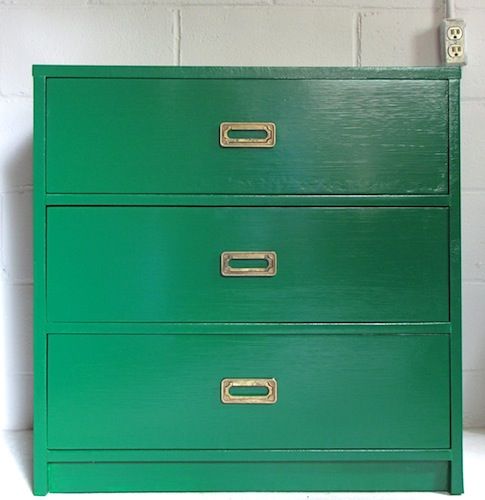
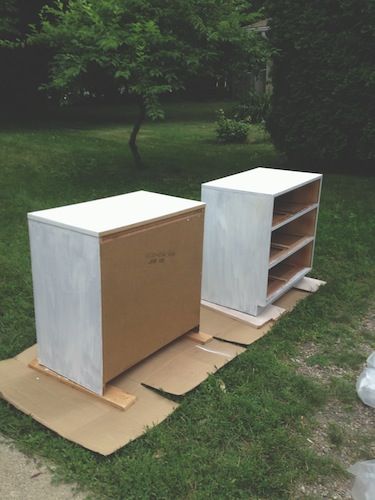
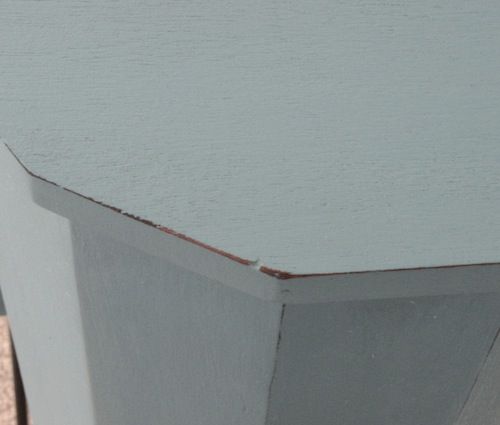
As for the two similar looking dressers, I really don’t want to tell you all that it took to get them there. I’m not happy with the quality of finish the green piece has. I chose a saturated emerald green to make the brass hardware pop. Since it’s partially laminate, it’s rather glossy and even after 2 coats of primer and 4 (yes 4-an entire quart of paint), it’s uneven and will need touched up after a little use. Some of it had water damage and with laminate….just….don’t. But it’s finished and some think I’m being too hard on it and myself. I’ll be happy when it leaves my sight which is the first time I’ve felt that way about a piece.
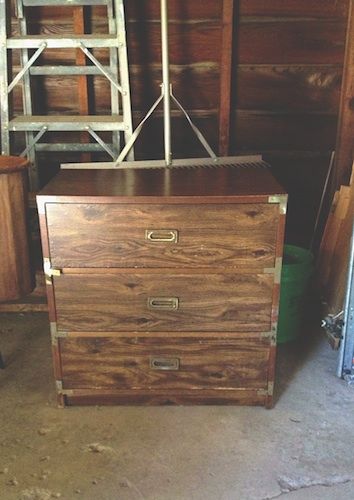
Before
After
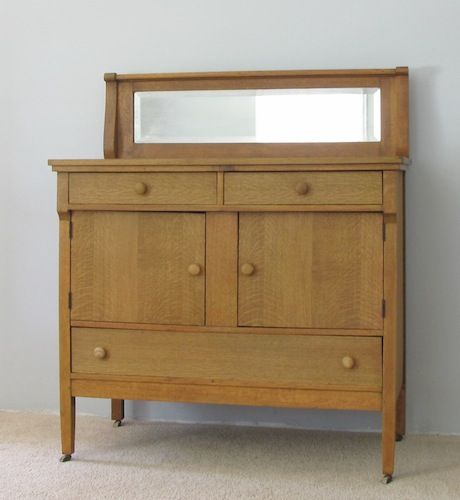
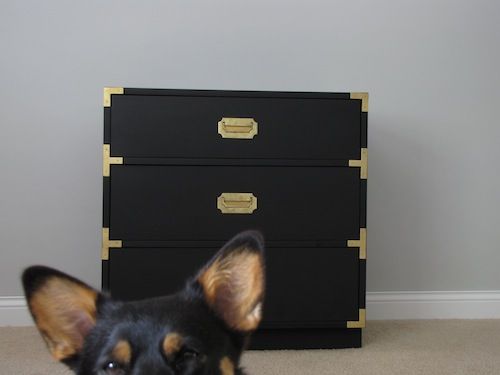
The black campaign dresser with original brass hardware and brackets turned out lovely. A lot of work for something that was to be one of the easier pieces. Seems kind of worth it when I see the amount of interest people have in it on etsy and craigslist. I really like this one.
The photobombed version with Vivi
The ideal nightstand/storage/dresser in one. I chose matte black to highlight the brass hardware. I love contrast. It’s in our etsy shop and if you’re in the Minneapolis area we are close if you’d like to give it a home.
Both were pains in the hardware cleaning department.
The now green piece had brackets before-making it look like a faux campaign dresser. I had every intention of putting them back on…until the brackets did not clean well nor did they look very good with Rub N’ Buff applied or any number of tactics like gold leaf spray paint and steel wool buffing. A mess. And while the brass pulls still look, shall we say, patina-ed, that was after mucho work. I liked the look so I kept it and a teensy bit of my sanity. (I used Brasso and Barkeepers Friend on both.)
I’m in the midst of a terrible, horrible, no good, very bad day week, guys. The kind that makes you wonder why you even keep trying. One thing after another. I’m trying to get past all that so I’m not going into detail.
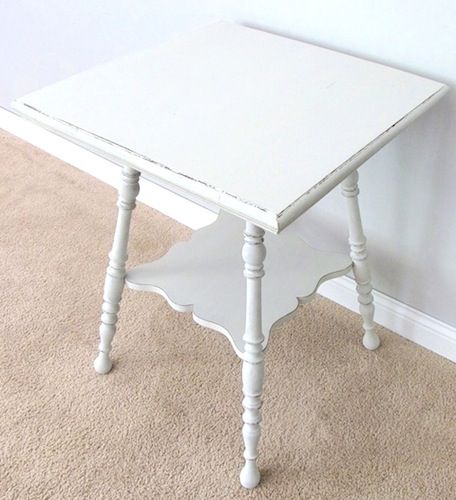
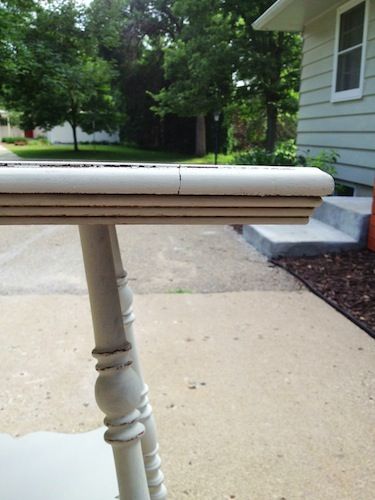
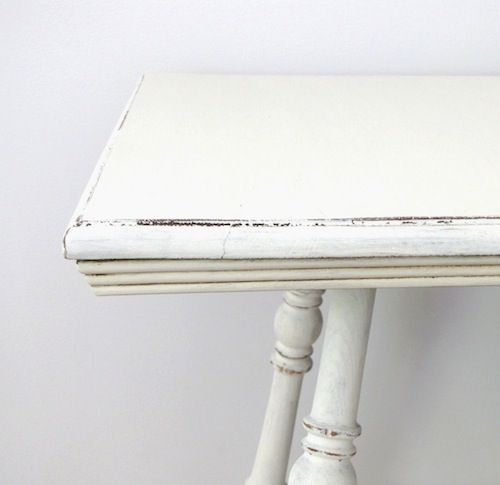
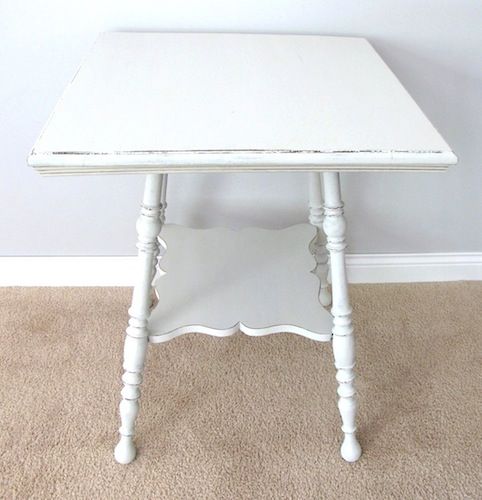
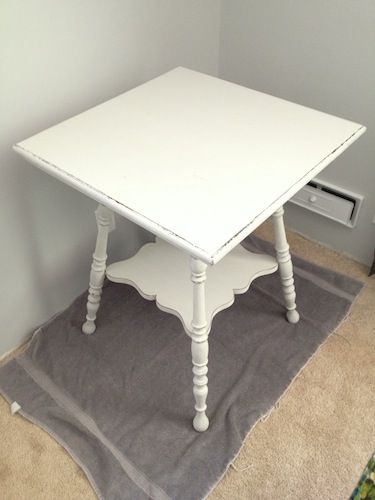
No, instead I’m back to share the two most recent milk painted pieces-the sewing cabinet (which is actually more of a side table than cabinet) and my mom’s former side table. The only pieces I have done a distressing technique on because I haven’t been the biggest fan.
You’re reading the words of a changed woman though.
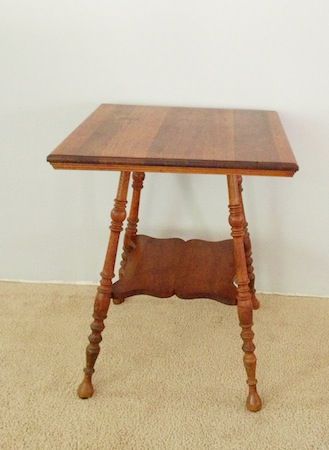
The befores
I will not be distressing every piece but on the right furniture, aging, distressing and chippiness add more character. Plus milk paint kind of begs you to in my opinion.
I don’t think I was too shabby at it. Or I was because this is a shabby chic/cottage/rustic look.
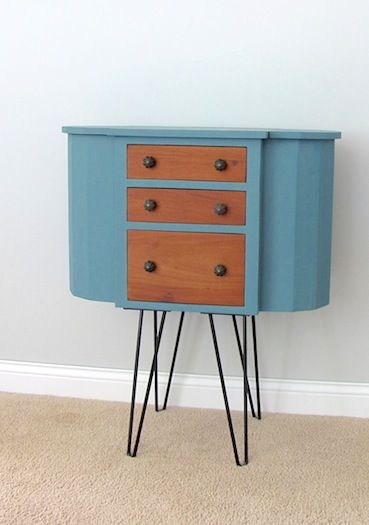
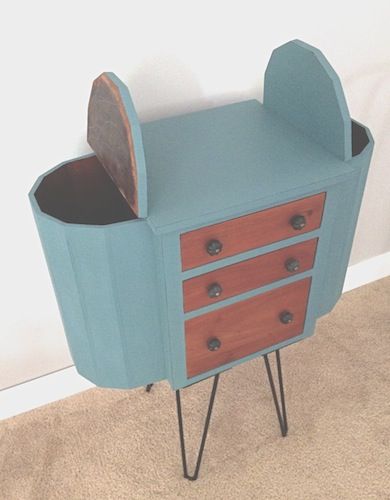
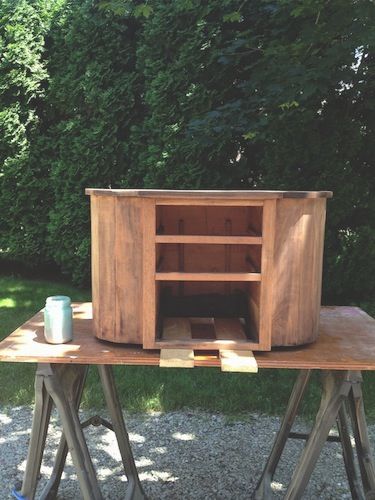
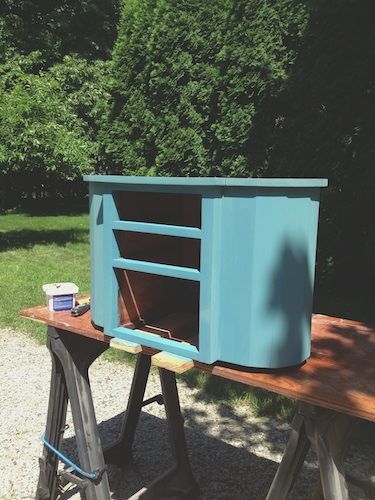
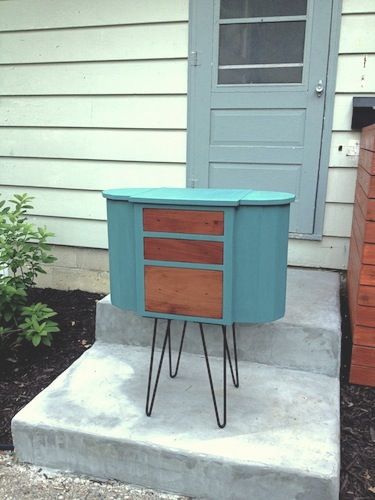
Even though there are hairpin legs on the sewing cabinet. As soon as I saw it last year at that barn sale with broken legs I knew what I wanted to do.
I like mixing styles so it got a bit of a mid-century twist. I didn’t want such a traditional, stuffy look.
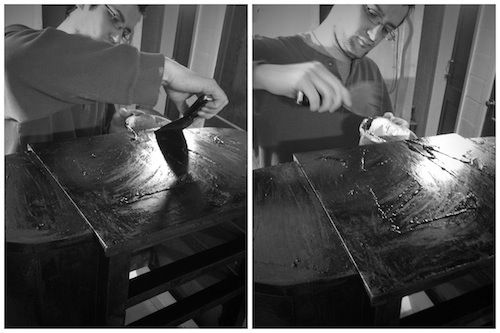
The entire piece is made of walnut and had a very heavy dark reddish stain and a tough, shiny finish (not my favorite to remove) which took some Soy Gel stripping action to get off…or mostly off. Stubborn thing. I also sanded with my orbital sander and some coarse paper. Painting was the fastest and easiest portion of the project. I knew I wanted some iron looking hardware and finally found some smaller scale knobs from Hobby Lobby. It finally all came together.
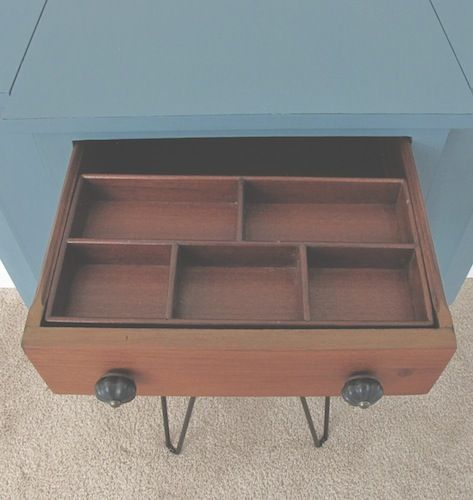
The sides flip up and provide deep storage compartments. I really wanted to find an old umbrella and stage my pics with it but that didn’t work out. The top drawer has a removable compartment for thread or whatever since this doesn’t have to be for sewing.
The only part I was unsure of was whether or not to paint the drawer fronts but, in the end I wanted a more rustic feel so they just got a few coats of hemp oil. I must admit I did not intend for it to be this color and while my pics make it look pastel, it’s a rich turquoise. My original aim was sage green to go with the natural drawer fronts. I love what I ended up with though.
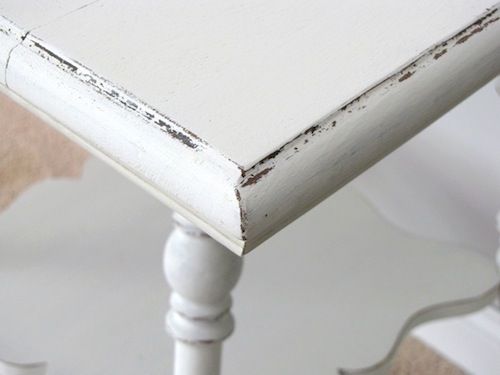
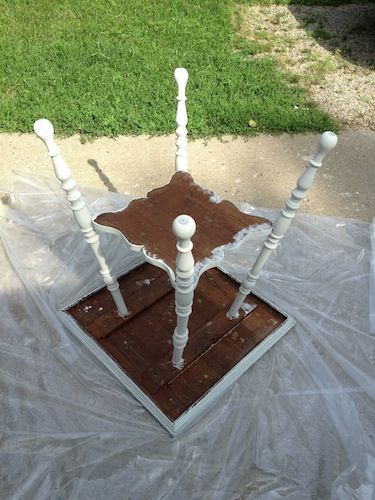
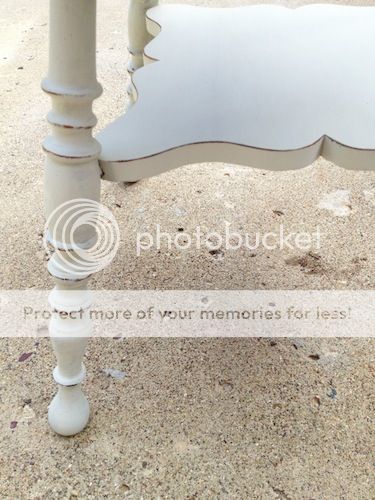
After a few repairs to my mom’s old table and an in-depth sanding session later, it was ready for paint. I tend to do a normal first coat when it comes to milk paint. Using the suggested ratio of powder and water then the second coat is more of a glaze (depending on how the first coat dries) with more water. I end up with an even look this way and again, it depends on your surface and since mine is typically raw wood I don’t have many problems with evenness. There were some great chippy spots that showed up naturally that I adore.
It took a few hours to get the distressing finished with those spindle legs but I am also a newbie when it comes to the technique and didn’t want to get carried away so I often stepped back to check my work.
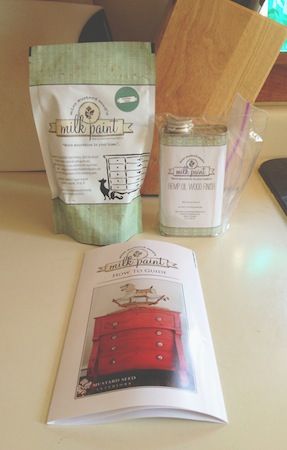
The sewing cabinet was painted using Miss Mustard Seed’s Kitchen Scale milk paint, a rich turquoise/aqua, and the side table is her Grain Sack, a neutral gray/cream/off-white.
I have tried other milk paints but prefer hers after these last two projects. Wonderful stuff. Once you get it mixed (the tricky part since it comes in powder form and you mix it with water), it’s so easy to use and her colors are beautiful. You can mix the powders for a unique shade and since I now have 3 pouches of different milk paint in the fridge (cause that’s where I recommend keeping it) and another pouch on the way, I intend to mix my own colors. Just need more furniture…can you believe we’re out of pieces with all my collecting?
I recommend mixing only what you need although covering your container of leftover paint and using it within a day or two is fine. I think it’s easier just mixing what you need though. We invested in a mixer that attaches to the drill which worked well until it came time to clean up and the clumps wouldn’t come off. Not sure I’ve found the ideal way to mix milk paint yet but I’m working on it.
Milk paint has a mind of its own but provides a great matte finish. There are ways to cope with the varying issues like a bonding agent. I usually just sand my pieces very well to begin with, getting it down to raw wood, which helps the paint soak in and adhere. Want more info about milk paint, get it here from the queen herself, Miss Mustard Seed.
On the side table, I also tried my hand with dark wax to accent the ridges. I mixed the dark wax (Annie Sloan’s wax) with the clear/light wax (Fiddes & Sons) then applied the brownish tone (what results) with my wax brush. I knew to be sure and have cloth nearby for wiping because it will stain your paint which is why you either first apply a clear wax, putting it where you want the dark wax, then the dark goes on top of the clear/light or mix the dark with the light wax and apply. Follow up by wiping the excess with your cloth. There are other options when using wax but that sounded the easiest to me. This tutorial from the Purple Painted Lady helped me out with the dark wax issue.
Both tables were rubbed with 120 grit sand paper to distress those areas that would naturally have some wear then they were finished with a few coats of our new favorite finish, hemp oil. It’s natural and you just wipe it on with a cloth. You don’t have to worry about brush strokes. Awesome. The oil just works so well with milk paint which must have a finish coat to protect the paint. It will not cope with liquids until you have put a protective finish (wax, poly, oil, etc.) over it.
What are your thoughts on milk paint? What do you think of these two pieces?
We woke up to water in the basement due to a flash flood Saturday morning. It dropped 5 or so inches in a few hours or something like that while we slept. Not just those few areas that get water occasionally but every.single.room.
All of our materials and most of the belongings I’ve packed away for safekeeping through our never-ending renos and impending move across the country were down there. At least we didn’t have the bathroom finished. The worst damage was on the vanity we bought to put in there so we’ve since decided to get a pedestal sink and avoid the potential for more damage later. We’ll put a cabinet in there for towels and such.
Those are my pjs, nasty work shoes and water in the basement after part had been sucked up by the wet vac.
I should also add that the water came through the window wells because first the gutters were clogged in the storm then all the rain fell into the window wells and came through the window on top of the water that seeps through the block (still working on waterproofing the basement). Basically it came from a few different directions to ruin our weekend.
I had one of those angry cries for a minute then started hauling things upstairs, trying to quickly put my childhood memorabilia in another box since it was on top of one of the plastic bins I use for storage and by the window so it was not safe. Most things were in those plastic bins because I just don’t think boxes are enough and we’ve moved way too many times so we invested in a number of them.
The entire house is a mess of supplies and temporary storage with the wet basement. This is what the kitchen looks like.
Of course a number of mulch areas we just put in washed into the yard, under the 3 season, down the driveway, into the window wells and onto the patio. I had the pleasure of cleaning that up along with the branches that fell. That’s pretty much an every other day task anyway. I noticed we have a bunch of dead branches and one large limb in our trees that will need professional help to get out. Oh the fun of home ownership.
It’s all cleaned up and the basement is almost dry. Just this morning I put most of the things back downstairs. Life goes on.
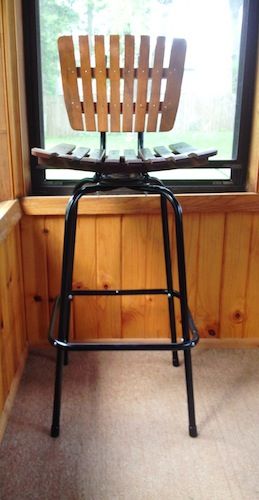
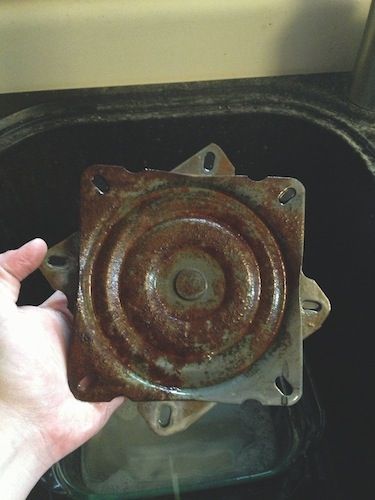
The next day I celebrated 4 years of writing at the Dabble, my other blog focused on food and recipes. By celebrate I mean worked in the garage on the free Umanoff chair. It’s cleaned up of some rust, put back together with a fresh coat of black enamel spray paint, new caps for the pipe, and after 3 days of soaking in Barkeepers Friend solution, the swivel mechanism is better/functions/but is not perfect. That stuff is awesome.) All with a popsicle hanging out of my mouth to help keep cool.
I really wanted to share the furniture projects I’ve been tackling while Greg is at his day job but I need some time to arrange that post and get more pictures. We had 7 projects going on in our small garage at once so I’m trying to keep things separate in my mind.
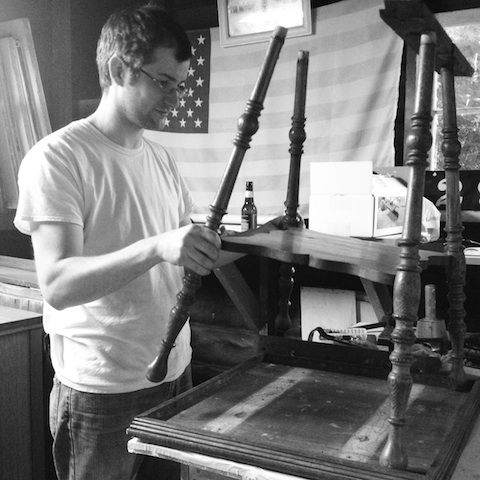
I ordered more hardware for the sewing cabinet, more Miss Mustard Seed milk paint (love it) and legs for Lieutenant Dan. That’s right, we’re tackling the big guy instead of selling him. He’s on the operating table as I type. Awaiting a sponge bath with Murphy’s Oil Soap after more sanding. I think we found some authentic-looking antique legs for him on etsy so stay tuned for his update.
My faux campaign dresser-the laminate one-has proven to be a tough project. I don’t think I will ever do a laminate piece ever again if I can avoid it. Too bad I chose it to showcase a new direction in terms of paint color for us. It’s not gray or blue like many clients and ourselves have picked the majority of the time in the past. I thought about not telling you and just moving on but I can’t do that to you. I also don’t have a picture because it’s still curing-quite humid here. Look for it later.
The side table my mom gave us is finished. I put the final touches on it yesterday (dark wax…something new for me) then brought it inside to cure and will soon share more about that with the green dresser.
I’ve mentioned in the past how I am not the biggest fan of distressing furniture but this table kind of screamed “try it.” So, I did and think I’ll continue on the right piece, not every piece. I thought it was my first time distressing something but I added a light bit to the sewing cabinet a few weeks ago.
I used hemp oil from Miss Mustard Seed and the oil quickly went up in ranks as our favorite way to finish furniture. Light distressing and hemp oil just go together. I get it more now. Just wipe the oil on, it’s natural and imparts a lovely sheen and saturated tone to porous surfaces.
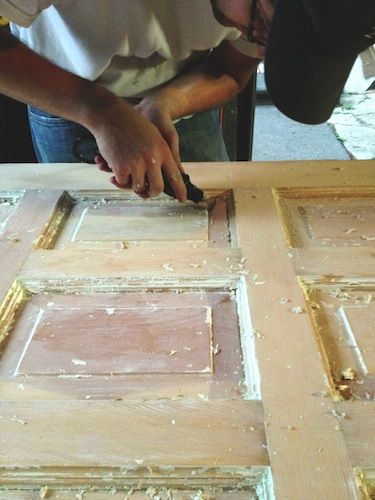
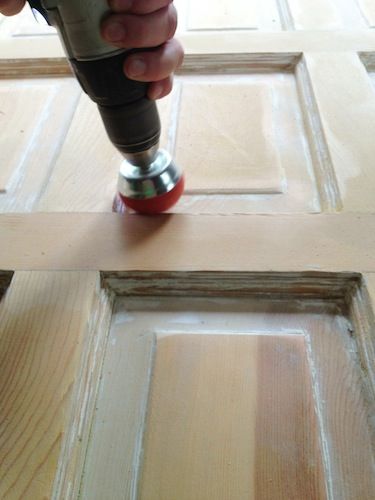
(Mostly) Greg got that free “new” front door stripped of paint and sanded. It’s ready for primer…which brings me to the fact that we broke down and bought that Wagner Flexio paint sprayer. Menards is having a 15% bag deal in which anything you can fit in it gives you yep, 15% off so we saved $21. Even though it technically didn’t fit but the cashier gave it to us anyway. Nice! This airless sprayer will be great for our furniture refurbishing and all those doors and trim for the house. We’re pretty excited…yes, over a tool. That’s how we roll.
Today’s temps are around 90 and humid so I may not be doing my usual afternoon work in the garage. I’ve moved on to the actual campaign dresser with only a few spots to put wood filler over and since I primed it with the green dresser, it will soon be ready for paint. I cleaned up the hardware and corner brackets (which involved Brasso, Gold Leaf Rub N’ Buff, steel wool and eventually Krylon gold leaf spray…that’s a story) but there’s still work to be done that will be easier to do when the entire thing comes together.
I’ve made this long enough so I’ll be on my way. Have a great week!
Do you want to hate me? I’ll give you more (or your first) reason to today.
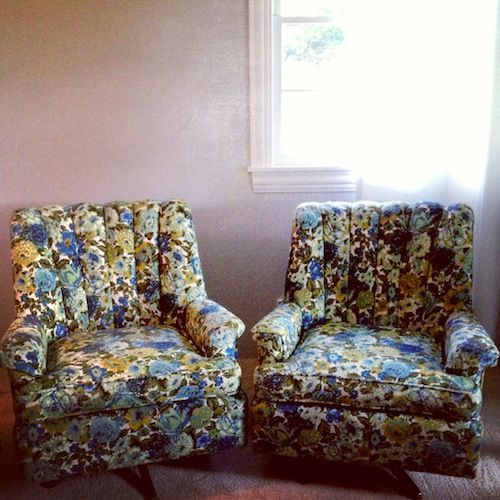
I found these two vintage floral chairs on craigslist last Friday. For free. Nearly perfect condition (minus missing one slipcover) and in blues/greens which are the most appealing shades for this type of vintage floral fabric, right? Unless you don’t get the magic of some of the furniture your grandparents have/had. These get me even though I’m not a floral person. I’ve actively searched for chairs like these to purchase, all got away rather fast then woosh, in the free section on craigslist. Like to think I did something pretty good to deserve these.
And I was one of those people who swooped in and took it from someone else who thought these beauties would be theirs that afternoon. Wahwah. The owner told me if we could be there before 2, we could have them instead. The problem is that Greg was at work in the metro and they were still 30 miles north of there so he left work to get them then went back to work. 60 more miles under his belt that day. But I’d say worth it. I don’t even feel too bad for the other person. One look then a sit in these and I say weeeeeee because they swivel and rock. And that’s fun so I forget the bad feeling.
Primed and ready to go. One is already painted in the saturated tone I picked up last night.
On the 4th of July we took a trip to Minneapolis to pick up more of the special order subway tile we need for the bathroom. We’re taking the subway tile we bought for the upstairs bathroom reno and using it in the basement bathroom reno since we moved the schedule around and won’t be getting to the other one until who knows when really. Just happened that someone had 2 boxes left from their project, listed them on craigslist and ta-da we saved big bucks.
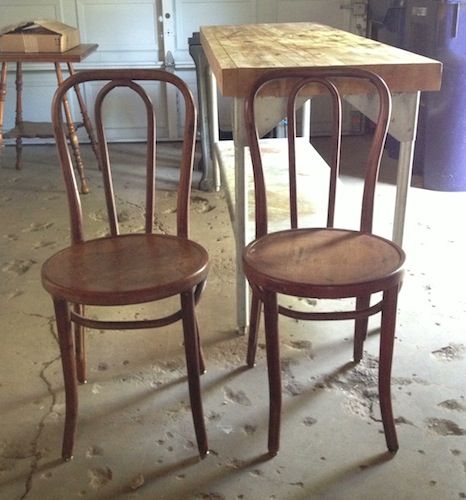
While up there, we stopped at Whole Foods, a barn sale (not worthwhile) and picked up these 2 chairs from another craigslister. They are not bentwood chairs from Thonet (not that it mattered to us) as they look but from a company called the Great Northern Chair Co.. Thonet, thought to be a pioneer of industrial design, mastered the art of steaming and bending wood then that method was reproduced by several companies, Great Northern Chair Co. being one. We’re both amazed with this process, especially Greg since he is a furniture design guy for his company. Inspiring talent. Old and sturdy, built to last-a quality we admire and collect.
I have wanted this style of chair for my eclectic mismatched dining room (whenever we actually get to make that happen) for years. $20 for the two. A little work and they are indeed in our dining room. So, now we have 2 steel-based Eames chairs, an Umanoff stool, Sturgis Posture chair, the vintage floral swivel chairs and these 2 Thonet-looking cafe chairs. My faux Tolix chair sold. I think we have a thing for chairs. I’m keeping my eye on another style on craigslist.
A glimpse of the basement project…
Also, I was supposed to show the basement bathroom progress from when my parents and sister came to visit a few weeks ago but have decided to wait until even more is accomplished. The goal is to have it finished by Labor Day. We’ve not done a thing to the space since they’ve been here. Nothing substantial anyway. I have most things picked out, about half has been purchased (or ganked it from the upstairs bathroom reno supplies) and we’re facing another $900 worth of materials. Which might as well be $1 million to us right now.
Instead of working in the cool basement, we’re sweating in the garage working on furniture and that free “new” exterior door we picked up a few months ago. Free is great (see above chairs) but we’re definitely pumping a lot of work into this baby. We didn’t have enough Soy Gel stripper so we picked up Zinsser Magic Strip gel (which is awesome) and then began the tedious job of removing a few layers of paint-one of which was black. We’ve been sanding, stripping, and lightly rinsing off the door. Hopefully we’ll be finished with that soon.
Greg and I have been trying to afford the Wagner Flexio 590 HVLP (high volume, low pressure/airless) paint sprayer-or find it on craigslist-which means we could spray all the doors, trim and furniture faster and easier with better results than by hand. It makes sense for us but it’s not in the budget right now. *I know I said we’d go for the Graco sprayer but upon closer inspection of the capabilities, it’s clear this Wagner would be much better for us.
The Martha Washington sewing cabinet is just waiting for hardware. But, I don’t have a clue on it for once and Hobby Lobby is taking forever to deliver the 6 sample knobs I ordered.
The 2 dressers are primed, we picked up paint for one and ordered paint for the other. My mom’s old side table has been sanded and painted but the sample size milk paint I ordered didn’t go as far as it said so I had to order more putting that project on hold.
Wanted to quirkify this classic sewing cabinet so I added hairpin legs and milk paint with a hemp oil finish (more talk about that later)…still looking for hardware
I love the rate we’re finding/working these days on furniture. This feels right. Any furniture finds for you these days?
We're Annie and Greg Witkamp (aka the Wits, aka Em & Wit Design). We salvage, refurbish and design furniture and homes. We're taking a break from an online & social media presence (for the most part). Our time on the blog was memorable and fun, but we're off to other projects and opportunities. Most derived from our shenanigans here. We'll drop in once in a while, but just know we're off chasing our dreams, tackling goals and living a life we enjoy.
Our specialty is wood furniture in rough shape that we come across on craigslist, at estate sales, on the curb, in a barn, you get it. Those pieces are cleaned, repaired, refurbished and good to go for years to come. Sometimes we design our own pieces.
As of spring 2016, we decided to make this website, the Wits, about our remodeling homes and emandwit.com about the furniture. You can shop there, ask us questions, see our newly finished pieces and portfolio.
We sold our second remodeled home near Seattle in August 2018 and moved to Richmond, Virginia. Getting to Washington was a goal that took years to achieve, but we had an opportunity come up and we grabbed hold (again)!
You can watch our journey right here, there, and/or through Instagram.
-To see the projects we did to our first home, check out the home improvement page. To see our current home projects, scroll through the most recent posts. (I need to update that....)